
Petz Workshop 101
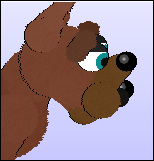
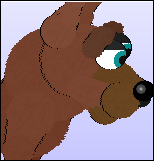
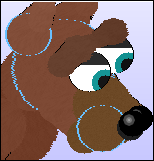
This is a complete walkthrough of Petz Workshop (download in links section). Here is explained all the tools and features of PW in detail. I recommend becoming familiar with this before reading my other PW tutorials. :DI've opened the dane file just as an example, this tutorial applies to all breeds and species of petz.
Make sure you make backups of all your breedfiles!

Table of Shortcuts
Opening a BreedfileApply Changes to Base Data
Deleting Variations
Tools
Balls; Move Ball
Balls; Ball Color
Balls; Ball Size
Balls; Ball Texture
Balls; Outline Fuzziness
Balls; Outline Color
Balls; Outline Thickness
Balls; Delete Ball
Linez; Line Color
Linez; Line Size
Linez; Outline Fuziness
Linez; Outline Color
Linez; Delete Line
Paintballz; Select Ball to Edit
Paintballz; Add Paintball
Paintballz; Delete Paintball
Paintballz; Clear Paintballs
Paintballz; Add Tattoo
Paintballz; Save Tattoo
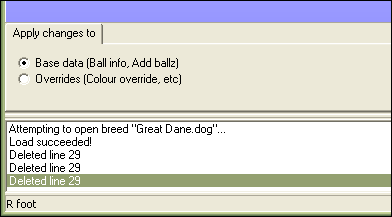
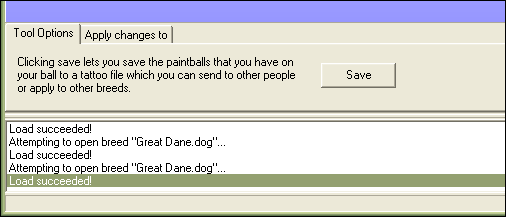
Opening A Breedfile
Open up Petz Workshop (or "PW") and select File > Open...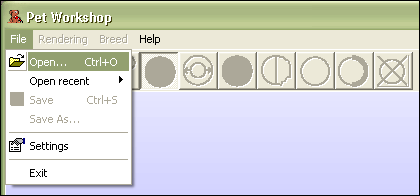
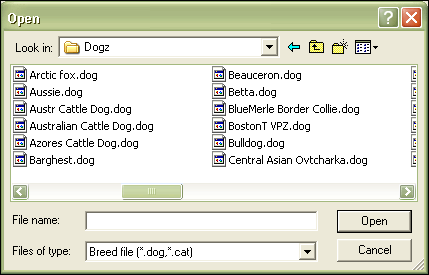
Navigate to your Resource\Dogz(or Catz) folder and select your breedfile.
Top
Apply Changes to Base Data
You want to apply all of your changes to the "base data" of the breedfile. Working in [Ballz Info] instead of the various [Overrides] sections allows for easier touch-ups in LNZPro later, since everything is clearly labeled for you.
Look at the tabs on the bottom of PW and pick "Apply changes to," then pick "Base Data" as shown.
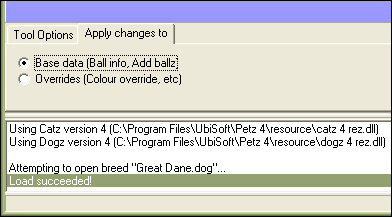
Please note, you must do this every time you open a breed in PW! Even if you've saved the file, you must check this option again when you re-open PW.
Top
Deleting Variations in PW
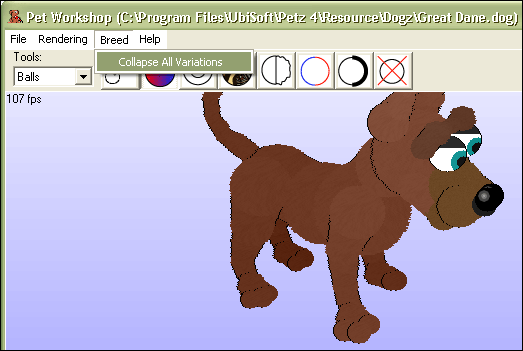
A variation is what makes a breefile come in different colors, like how labs can be yellow, chocolate, or black. When hexing a typical file for trading, you'll only want one "variation" to come out of the AC. The Collapse All Variations feature of PW is used to delete all variations in the file except the one you're currently looking at.
You can also do this quite easily in LNZPro, but this is a nice shortcut if you do it correctly. It helps to look at the file in LNZPro first, however, and note what coat color is used in [Ballz Info]. I call this the "default variation," because all other variations are added in the [Color Info Override] section of the breedfile (along with the [Outline Color Override] and [Paint Ballz] sections, among others).
Generally you don't want to work in any [Override] sections, because they aren't labeled nicely and it's annoying lol. That's why we checked "Apply changes to Base Data" earlier.
So take a peek in LNZPro and note what coat color (first number) is used in [Ballz Info]. You'll want to keep reopening (just use File > Open Recent > breed.dog) your chosen breed until you're looking at the variation that matches that coat color. For example, the red dane without the snout patch (if some variations of the breedfile have spots and others don't, you usually want the spotless one) is the "default variation" for the great dane.
Select Breed & Collapse All Variations. A warning will pop up asking if you're sure, pick Yes.
Select File & Save and you've deleted your variations! Now only the dog you're working on will come out of the AC.
Top
PW Tools
PW has 3 set of tools; Balls, Lines, and Paintballs. Depending on which set you pick from the drop down menu, the icons to the right of that menu will change. At the bottom of PW is the "Tool Options" tab, which lets you set different aspects of the currently selected tool.
I'm going to walk you through all of PW's tools and how to use them.
Top
PW Tools; Balls; Move Ball
This is the first tool in the Balls set, and allows you to grab an individual ball and move it around. I find this very useful for addballz since I like to see what I'm doing as opposed to messing with coordinates, and it's easy to touch-up in LNZPro. I try not to use this tool excessively on ballz that are in [Ballz Info] (a little adjusting works fine, like on the ears, tail, nose/snout, etc.), because other things need to be adjusted like [Move] and [Project Ball] and I personally don't like messing with those sections too much lol.
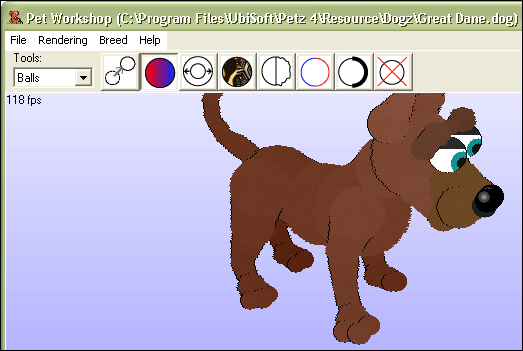
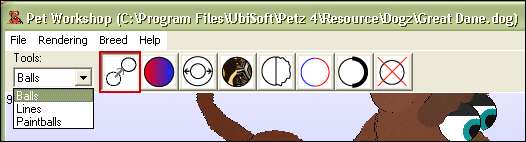
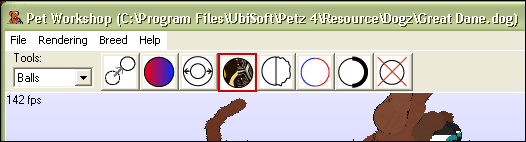
Remember you need to actually click on the Move Ball icon, because PW defaults to Ball Color for some reason. The top of PW should look like this. I'm picking the "Balls" tool set, and I've highlighted the tool we're working with in red.
The bottom of PW has the "Tool Options" tab, which in this case gives you instructions on how to move the balls around.
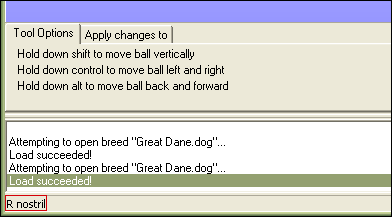
If you hover over a ball, PW will also tell you what ball you're selecting on the very bottom. This is very useful for little addballz, or ballz that are covered or hidden by other ones. I highlighted this in red, the right nostril ball for example.
You use this tool just as PW tells you. Click on a ball and hold it, hold down the Shift key on your keyboard at the same time, and drag the ball up and down. You can only move up and down while holding Shift.
Click on a ball and hold it, hold down the Ctrl key on your keyboard as well, and drag the ball left and right. Again, you can only move left and right while holding Ctrl.
Click on a ball and hold it, hold down the Alt key on your keyboard at the same time, and drag the ball backwards and forwards. You can only move back and forth while holding Alt, like before.
If you're following along, use what you just learned to move the nostril (or whatever ball you moved) back to it's original position. Remember there is no Edit > Undo in PW, so you have to move things back yourself! It's also good to double check the ball you have selected because of that.
Top
PW Tools; Balls; Ball Color
This is the second tool in the Balls set. Pretty self explanatory! :D I highlighted it in red.
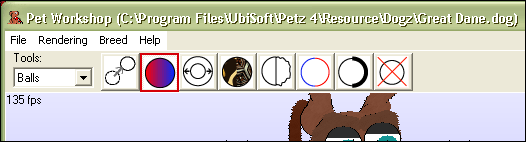
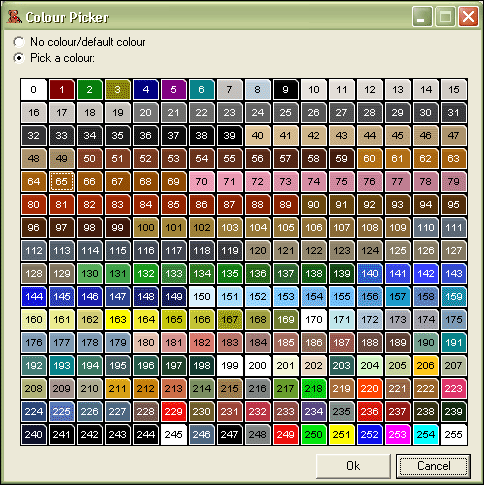
The "Tool Options" tab show you what color you have selected currently. If you click on the box of color, PW brings up its color chart and you can pick a new color simply by clicking on it.
Remember not all colors on the PW chart are accurate, especially the upper 200's. 1 through mid-200's are fine, just always double check in Petz before sending out any .pet files. There's a more accurate chart (not perfect, since some colors change) here.
I chose 65, for example. Pick a color and click "Ok"
Then just click on the ball you want to color. Easy!
Top
PW Tools; Balls; Ball Size
The third tool in the Balls set is Ball Size, another very easy one to use. It makes ballz bigger and smaller, by as many or as few sizes at a time as you want. 5 sizes is the default setting, and generally that's a good amount.

The "Tools Options" tab allows you to pick whether you are making the ball bigger (increasing) or smaller (decreasing), and by how much. Use the arrows to the right of the number to adjust the amount increased/decreased.
Click on a ball to adjust its size, and that's it!
Top
PW Tools; Balls; Ball Texture
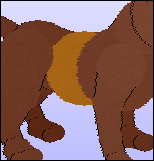
Ball Texture will change the texture of whatever ball you click on. This is the fourth tool in the Balls set. This is great for changing in-game textures (the ones that naturally occur in Petz, like mottled5, hair3, etc.), but do not use PW to add external (i.e. downloaded or created) textures to your file!Always use LNZPro when adding external textures, because PW will try to make the texture internal and that doesn't work very well to say the least lol. It will work for you, but when you send a .pet to someone from the file it will cause a major headache.
The bottom has a drop-down menu that contains all textures currently in the breedfile.
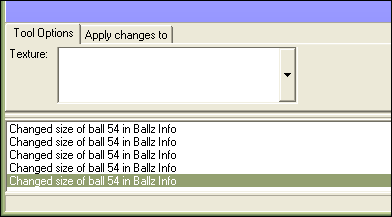
You can select one of these textures, then click a ball to change it to that texture. Just like changing the ball color.

You can also pick completely different textures, by looking at the right side of PW (with all the tabs) and choosing the "Textures" tab.
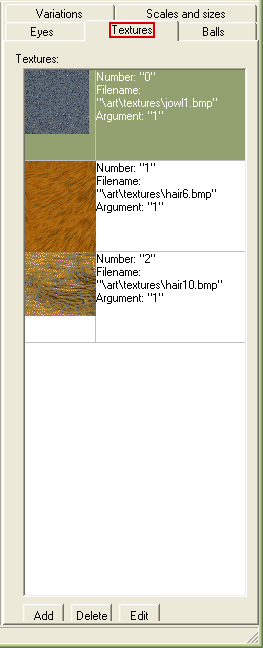
On the bottom you'll see "Add," "Delete," and "Edit" buttons. These let you add a texture to the list, delete the selected texture, or edit the selected texture respectively. Normally you'll just need to change the textures, so click on the "Edit" button. You'll get this screen.
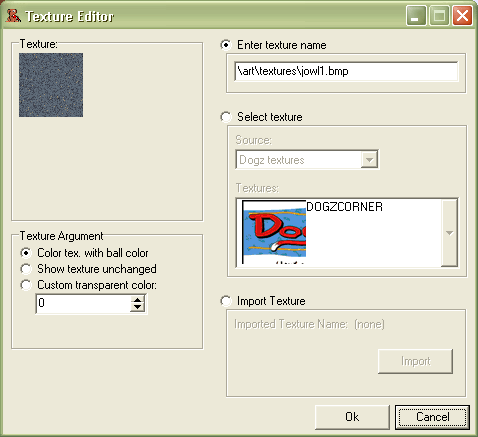
- Texture: shows the current texture
- Texture Argument is the argument, or tranparency, of the texture. "Color tex. with ball color" means just that, the texture is "clear" over top of the ball color (argument "1"), "Show texture unchanged" is just that as well, the texture will show up as it appears in the picture (argument "0"), and "Custom transparent color" lets you pick a color within the texture to make "clear" and let the ball color show through. For example when hair6 is set to 65 for a brindle effect, you are making the orange color (65) in the texture transparent. A wonderfully in depth list of textures and their arguments is here, made by Amber @ Flummery. Two more texture charts are here, and here. Experiment, textures are lots of fun!
- Enter texture name can be used if you know the texture you want off hand, just change "jowl1.bmp" (or whatever) to "texture.bmp" Remember, don't use this to add external textures! Always do that in LNZPro.
- Select texture let's you visually select a Dogz, Catz, Petz, or Breedfile texture. Those menus are a little off, you're better off using Amber's chart to know which textures require Catz or Dogz, or either one. Breedfile you won't ever use, it's just the breedfile's AC picture lol.
- Import texture you will never use! Like I said, this doesn't work well when you want to send .pet files to people for adoption. Use LNZPro! Click the "Ok" button when you're finished editing your textures, and use the tool normally with your new textures.
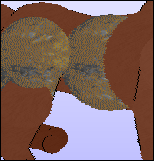
Here I used plush at argument 0, or "unchanged," on the belly and hip.
Top
PW Tools; Balls; Outline Fuzziness
Outline Fuzziness is the amount of "fuzz" on a ball, and the fifth tool in the Balls set.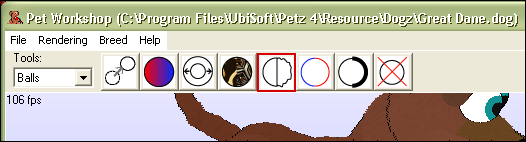
The "Tool Options" tab lets you change the fuzziness up or down. 0 is totally smooth, and 4 is about as high as you want to go. Anything higher than 4 starts to look less fuzzy and more like static lol. You can see a little preview right underneath the fuzz amount in the "Sample". 2 is the default setting.
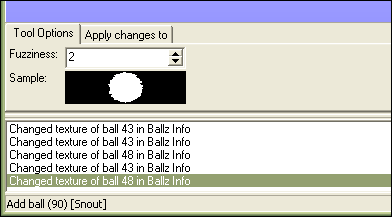
Pick your fuzziness level and click the ball you want to change, just like the other tools.

Top
PW Tools; Balls; Outline Color
The sixth tool in the Balls set is Outline Color, and it changes the color of a ball's outline. :P This is especially useful for certain breeds who have precolored outlines, like the lab and scottie, that match the AC dogs' coats. The color defaults to the last one you used with the Ball Color tool.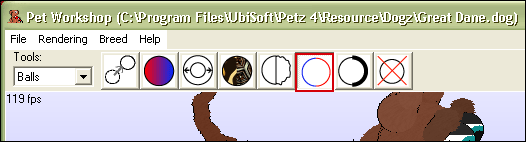
The "Tool Options" tab at the bottom works the same way Ball Color does. Click the color box to pull up the color chart, and select a new outline color.

Click on the ball whose outline you want to change. I picked 155 and clicked the head, r jowl, and r ear 3 ballz.
Top
PW Tools; Balls; Outline Thickness
Outline Thickness is the seventh tool in the Balls set. It changes the thickness of a ball's outlines, and whether it's on the right side, left side, or both sides. It can also remove outlines if you pick the "No outline" option.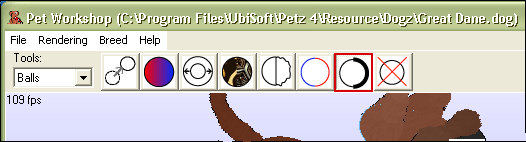
The "Tool Options" lets you pick no outline, out the right only, left only, or both sides of the ball, and lets you make a ball look like a nose (lol). You probably won't use the "Draw as a nose" option a whole lot.
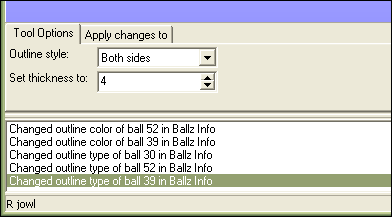
Just click on the ball to change the outline type and/or thickness. I selected "Both sides," set my thickness to 4, and clicked head, r jowl, and r ear 3 ballz (same ones I used in the above tutorial).
Top
PW Tools; Balls; Delete Ball
The last tool in the Balls set is Delete Ball. It can delete a ball (where possible) from the breedfile, or add the ball number to the [Omissions] list and omit the ball. Generally I chose to omit balls, that way you can always bring them back later by just removing the ball number from the [Omissions] list. PW won't "unomit" balls like it claims to, but that's not really a problem.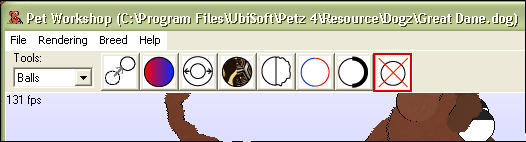
"Tool Options" just lets you pick between omitting balls and deleting them, but you usually only ever want to omit them.
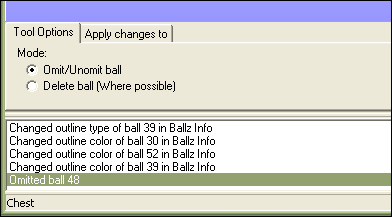
Click the ball you want to omit. The belly, for example
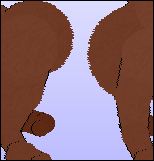
This is really useful when doing a lot of paintballz, since some balls (like the belly and chest) cover each other and make it hard to line up markings sometimes. With this tool, you can just omit the ball blocking your view, work on the other ball, then go into LNZPro and remove the belly (48) from the [Omissions] list.
Top
PW Tools; Lines; Line Color
Line Color is the first tool of the Lines set. It will change the color of a line, but be aware that doing this will remove the texture of the line. A line takes the color of it's "start ball," so a better way to change a line's color is to do so in LNZPro by switching the numbers in the "start ball" and "end ball" columns. I almost never change line colors in PW, so this explanation is brief. This tool works just like Ball Color.Pick "Lines" from the drop-down menu and then click on the icon that I highlighted below.
The "Tool Options" tab at the bottom of PW allows you to click the box of color to pull up the color chart and pick a new color.

Click the line you want to change the color of.

Top
PW Tools; Lines; Line Size
The second tool in the Lines set, Line size with make a line bigger or smaller. This is especially useful for puff tails.
"Tool Options" lets you set the amount you want to increase or decrease the size of the line by. 5 is the default and is usually a good amount.

Click on the line you want to make bigger or smaller.
Top
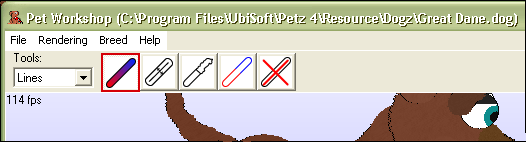
PW Tools; Lines; Outline Fuzziness
Outline Fuzziness is the third tool in the Lines set, and changes how fuzzy a line is. Many people forget to add fuzz to linez, but it looks nice especially on puff tails and on hexes that are going for an all-over fluffy look. This does NOT affect the texture of the line like Line Color does.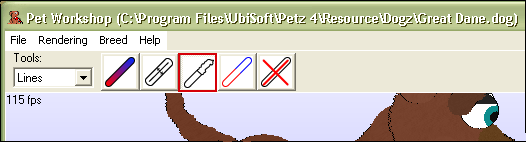
The "Tool Options" tab lets you change the fuzziness up or down. 0 is totally smooth, and 4 is about as high as you want to go. Anything higher than 4 is a little too much. You can see a preview right underneath the fuzz amount in the "Sample". 2 is the default setting.
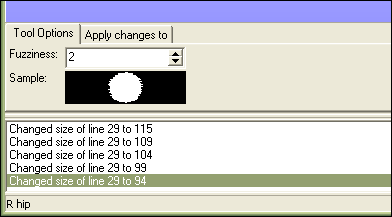
Chose an amount of fuzz and click on the line you want to change.
Top
PW Tools; Lines; Outline Color
The fourth tool in the Lines set is Outline Color, and it colors a line's outline just like the one for ballz. It won't mess with the texture like Line Color will. I find this useful when making addball additions, because often times you'll want to give the lines an outline as opposed to the addballz. It helps the addition look smoother, instead of just a bunch of balls stuck together. If you want a line to not have an outline, just use the same color as the line itself.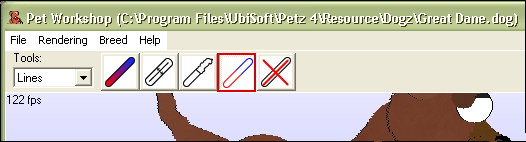
"Tool Options" at the bottom of PW lets you pick a color for the outline by clicking the box of color to pull up the color chart. Click on a color to select it.

Click on the line you want to change.

Top
PW Tools; Lines; Delete Line
Delete Line is the last tool in the Lines set, and it simply deletes lines. Remember, there is no "Undo" action in PW so delete with care. You can add lines back in PW which I talk about in the "Addballz in PW" tutorial.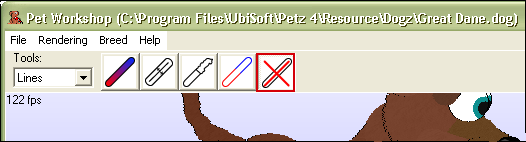
There actually are no "Tool Options" for this tool, so just make sure your changes are still being applied to "Base Data" and leave that section alone.
Click on a line to delete it.

Top
PW Tools; Paintballs; Select Ball to Edit
The very first tool in the Paintballs set is just your standard selection tool. It will make all other ballz semi-transparent so you can see which one you have selected. It won't make other paintballs transparent, though, so sometimes you'll have to temporarily omit ballz in order to see what you're doing. You must first select a ball in order to use any other tools in the Paintballs set.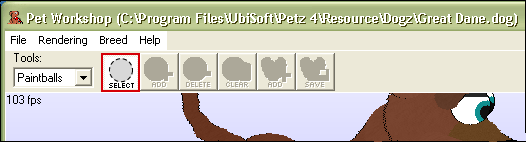
The "Tool Options" at the bottom just lets you "Deselect" the ball, which will make the other balls opaque again.

Click on a ball to select it.

Top
PW Tools; Paintballs; Add Paintball
Adding spots, or paintballs, is very simple. After first selecting which ball to work on with the selection tool explained above, use the second tool in the set to add paintballs.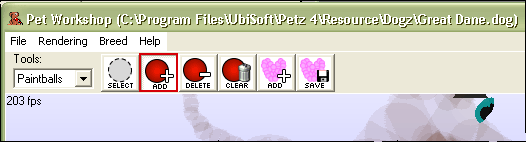
"Tool Options" at the bottom of the screen has a few different options you can apply to the paintball.
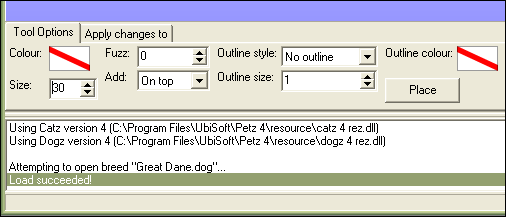
- Color pulls up the color chart and lets you select what color you'd like the spot to be.
- Size determines how big the spot is in a percentage. So the default, 30, is a spot that covers 30% of the ball. This is why spot sizes vary from breed to breed and ball to ball.
- Fuzz gives the spot rough edges, or fuzziness. 4 is usually as high as you want to go.
- Add tells PW how you want to layer the spot. The drop down menu lets you pick between "on Top" or "Underneath". "On Top" places the spot on top of all other spots, while "Underneath" places it beneath all other spots.
- Outline Style will give your spot an outline, either a complete one, left side only, right side only, or none (default). Personally I like to layer spots to give them an "outline" rather than add actual outlines, as this gives you more control.
- Outline Size adjusts the thickness of the outline, up or down.
- Outline Color pulls up the color chart again, and lets you pick an outline color. Once you've set up your option as you like, click out in the space surrounding the pet and drag to decide where you'd like to place the spot. Click the Place button when you like the placement. You can add a spot anywhere on any ball, overlap them, whatever. You just can't add spots to linez
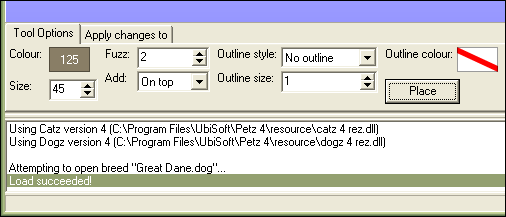
The spot will be placed wherever you see the faded spot.
Top
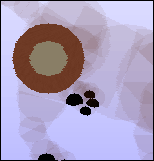
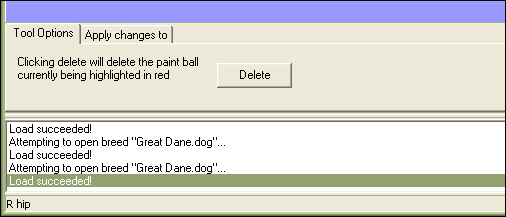
PW Tools; Paintballs; Delete Paintball
Pretty self explanatory, the third tool in the Paintballs set deletes paintballs one at a time.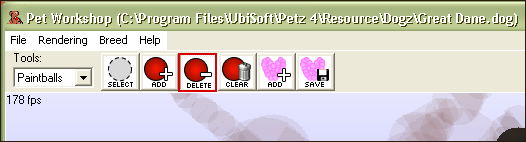
"Tool Options" at the bottom just contains the actual "Delete" button.
You'll see a paintball is highlighted in bright red when it is selected for deletion. To change the paintball, just click in the space around the pet and drag. You'll see the red highlight will jump around to different spots depending on the angle.
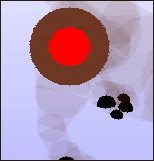
Once you have the spot you want to delete selected, just press "Delete". Remember there is no "Undo" action in PW, so double check.
Top
PW Tools; Paintballs; Clear Paintballs
Clear Paintballs works just like Delete, only it deletes every single spot on the selected ball."Tool Options" only contains the "Clear" button.
Select the ball you want to clear.
Click "Clear," it will ask if you're sure, and all spots will be deleted. Remember there's no "Undo" action in PW, so double check.
Top
PW Tools; Paintballs; Add Tattoo
The "Add Tattoo" tool allows you to add any tattoos you've saved yourself using the the next tool or that you've downloaded.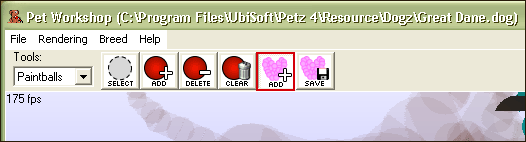
You can make adjustments to the tattoo with the "Tool Options," or add it as-is.
The blue link lets you pick a tattoo from your list of saved ones. You have to click in the list to scroll, then pick the tatto you want and click "pick".

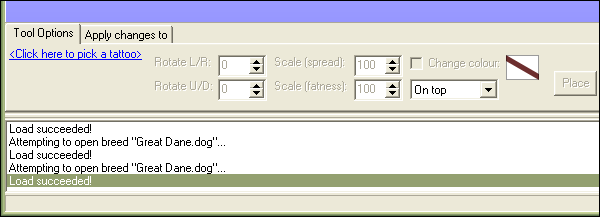
- Now you can use the "Tool Options";
- Rotate L/R moves the tattoo left and right as you adjust the numbers.
- Rotate U/D moves the tattoo up and down with the numbers.
- Scale (spread) moves the individual paintballs in the tattoo farther apart.
- Scale (size) adjusts the size of the individual paintballs in the tattoo.
- Checking Change Color will pull up the color chart and let you change the color of the entire tattoo.
- The drop down menu underneath that lets you pick whether the tattoo is placed on top of other paintballs, or beneath them.

Top
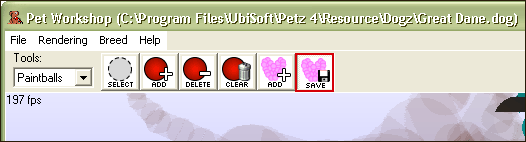
PW Tools; Paintballs; Save Ball As A Tattoo
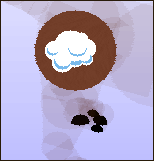
The sixth tool in the Paintballs set will save all spots on the selected ball as a tattoo. Use the tool exlained previously to add tattoos to other balls. These tools save time if you need to replicate complex spot patterns or design, or if you want certain markings to be exactly the same on multiple balls.Remember, it will save ALL the paintballs on your selected ball.
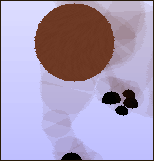
Say I wanted to save this cloud spot pattern to use on other hexes;
In "Tool Options" at the bottom, click "Save".
You can save some information on the tattoo if you like. This is useful if you plan to give the tattoo to others, or put it on your site for download. You do not have to fill in the first two fields, but I usually fill in the description if only for myself.

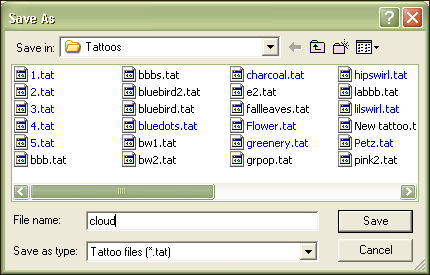
You can save it anywhere, but PW's "Tattoo" folder (the default) is where PW pulls it's list from for the "Add Tattoo" tool. So 99% of the time you want to save it there.
Click "Save" and you're done!
Top